Hello there, reader! This guide will give you the information about each and every monster and tower in the game! It will tell you how to use and counter each monster and tower, as well as other useful information you may need on the way to Map Room dominance!
You may be wondering, "Why should I read this monster and tower guide? There are a whole bunch of other ones already in existence." But I tell you, if you have ever paid close attention to those guides, they only cover sending in a mass amount of that monster. That is not how strategy is supposed to work! Spamming one single monster is not always the best way to take down defenses! And is there a guide out there that tells you how to counter certain monsters? Only this one!
Note:This guide is a work in progress, so please give it some time.
Note:You may be wondering why I say "Pokey" or "Ichi" instead of "Pokeys" or "Ichis." Believe it or not, it is proper grammar, as in the attack log, it usually says, "40 Pokey were flung in."
Pokey is your basic foot soldier. It is the easiest monster to produce, as it takes only 5 seconds and 1250 Goo to make. Pokey is best used in a big pack to maximize its effectiveness.
Using Pokey
When attacking, send a small mass of Pokey(about 15-25 of them)to take down any lone Sniper Towers or Tesla Towers without splash damage support. Remember not to send in all of your Pokey, because one Booby Trap means a lot of splattering blood and wasted Goo.
When defending, Pokey can be used to lag an attacker's computer. So many Pokey can appear to attack the enemy's monsters that their CPU cannot handle the data. This is impractical, however, and should not be used.
Countering Pokey
Countering Pokey should be the easiest thing to do. Make sure your Monster Bunkers are equipped with at least one splash damage monster, such as Bandito. Cover your Sniper Towers and Tesla Towers with splash support; that is, have a Cannon Tower nearby. If you cannot do this, place a Resource Gatherer before the Sniper or Tesla Tower, or put a Booby Trap where the Pokey will attack your lone towers.
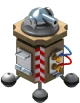
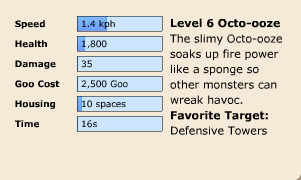
Octo-ooze
Octo-ooze is the easy-to-make tank. It will absorb damage for all your monsters, so they can wreak havoc without worry. Octo-ooze is effective when in a group, and is most famous for being able to stall the feared Putty Project X.
Using Octo-ooze
Octo-ooze is not meant to take down Defensive Buildings. It is meant to take damage for other monsters. Many people forget this! Send in a wave of Octo-ooze to stall the Defensive Towers, and send in your other monsters to attack other buildings while they are distracted. Every once in a while, send in a few more Octo-ooze, so that the Defensive Towers will continue to focus on them, not your other monsters.
When in the Monster Bunker, a mass amount of them can stall any powerful monsters, notably Project X with Putty Rage and D.A.V.E.
Countering Octo-ooze
A huge mass of Octo-ooze is susceptible to splash damage. A Level 6 Railgun can destroy a Level 6 Octo-ooze in just one hit.
Cover outside buildings with towers that have far range, and are on the inside of your base. That way, not all the towers will be occupied with attacking the Octo-ooze, and can still defend certain buildings from other monsters.
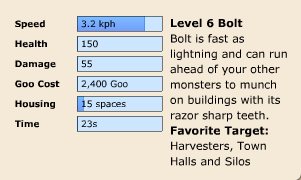
Bolt
Bolt is a resource looter with the ability to teleport, making it really easy to loot from multiple resource gatherers at a time.
Using Bolt
Bolt is just one counter-mechanism against the Silo Death Trap. When all the resource gatherers are down, Bolt will target the Storage Silos. Sometimes, it can teleport right thorugh the blocks protecting the Storage Silos, rendering the Booby Traps useless. Even if Bolt walks through the Booby Traps, it can disarm them for later looters to walk through.
Countering Bolt
Bolt is very tricky to counter, as its Teleport is crazy. Cover your Resource Gatherers with at least one Defensive Building. Spread out your Resource Gatherers, so that they don't teleport immediately to their next target. Consider integrating an ARGoH into your base. (Annoying Resouce Gatherers of Horror, placing Booby Traps where looting monsters will go to attack the next Resource Gatherer.) Keep your Resource Gatherers away from your Storage Silos, or you risk having Bolt teleport to your Silos.
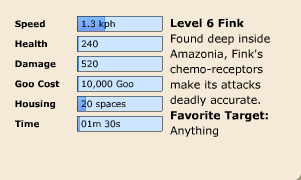
Fink
Fink is a glass cannon. It has a very high damage output, but is oh so fragile. Using Fink requires some skill and patience, but overall, Fink does not disappoint.
Using Fink
If you can keep Fink from being hit by one attack(by sending Octo-ooze or similar), it will demolish anything it can touch. Its Claws ability allows it to multi-task, attacking up to three extra targets. This means that Fink could attack a Monster Lab, while attacking a nearby Block to ruin pathing, a Pebble Shiner to loot, and a Sniper Tower to decrease the damage it deals to other monsters.
Countering Fink
Simple. Keep your buildings a block's width away from each other if you are really paranoid about Fink's Claws. Otherwise, upgrade your Cannon Towers, or fill your Monster Bunkers with D.A.V.E. and Bandito.
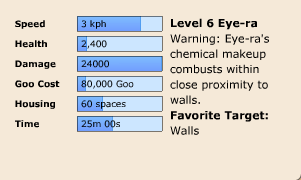
Eye-ra
Eye-ra is one of the more unorthdox monsters. Unlike many other monsters, Eye-ra specializes in destroying walls for your other monsters to go through. However, once it has attacked a wall, it explodes dealing splash damage to all nearby buildings, but killing Eye-ra.
Using Eye-ra
Since Eye-ra only targets walls, it may not seem very practical to use Eye-ra in general. However, Eye-ra is not usually used for destroying walls, but for baiting. To bait, send in a few Octo-ooze or similar monsters at a Monster Bunker. If the Monster Bunker is baitable, the monsters should come out without any tower support. Keep sending Octo-ooze to lure them out of tower range, then send in an
Eye-ra right on top of the monsters. BOOM! If they are not dead yet, send in another Eye-ra to finish them off before they go back into their bunker and restore health.
Eye-ra is a strong makeshift defender in the Monster Bunker, but is not too reliable. If you plan on using Eye-ra in your bunkers, prepare to replace them often.
Countering Eye-ra
Eye-ra is easy to counter. Place some spare Blocks around the outside of your yard. That way, Eye-ra will detonate on those Blocks, and not your main walls. Keep your Monster Bunkers inside your yard; otherwise, Eye-ra will destroy your monsters when baiting.
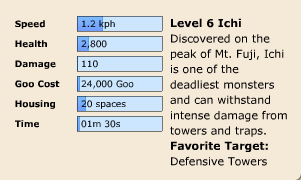
Ichi
Ichi is arguably one of the best monsters in the game. It can tank a lot more damage than Octo-ooze can, it is relatively cheap to produce, and it has the potential to take down Defensive Buildings.
Using Ichi
Ichi is very straightforward. Send in a big group of Ichi at a Sniper Tower, or send in Ichi one by one at a Cannon Tower. If these towers are supporting each other, I would say either cataplut your Ichi with 100,000 Putty Rage, or attack the towers from two directions. Don't forget to send other monsters to attack other buildings.
Ichi isn't really the best monster to use in the Monster Bunker. If you have no other monster available to put in your bunkers, however, Ichi can do the job for a bit.
Countering Ichi
Realistically, there is no specific way to counter Ichi. Ichi is so well-rounded that it is nearly impossible to counter it. My only suggestion would be to upgrade your Defensive Buildings, particularly your Laser Towers and Railgun Towers. Those are the few towers that stand a chace against Ichi.
If upgrading your towers is not an option, place some Whirlwind Bandito inside your bunkers. In a fight between an Ichi and a Bandito, Bandito usually wins.
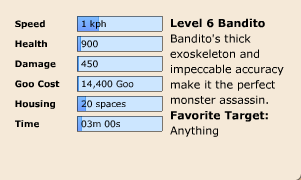
Bandito
Bandito is what I like to call the "Swiss Army Knife" of the monsters. It is strong in both attacking anddefending. Though it is admittedly weaker than other monsters in terms of stats, it will be an excellent addition to your monster army.
Using Bandito
Unlike most monsters that attack anything, Bandito can actually take a few hits. It is recommended to replace a portion of your Pokey army with Bandito. It hits harder, while being cheap and durable. But attacking isn't Bandito's strong suit.
The Monster Bunker is where Bandito really shines. Its Whirlwind ability is just plain ridiculous. A few Bandito in the bunker can be your counter mechanism against a Pokey bomb.
Countering Bandito
Bandito can be a nuisance to fight against. It isn't much of a threat to your base, so you should be fine as long as you upgrade your defenses. When you are attacking, on the other hand, Bandito proves to be troublesome. Remember that with the Level 3 Whirlwind ability, Bandito will hit ALL the monsters near it at TWICE the normal attack speed! This essentially means that a Level 6 Bandito will deal 900 damage per second! The only way to beat it would be to get a monster that can defeat it outright(Balthazar or Project X), or send in an Eye-ra while the monsters are skirmeshing.
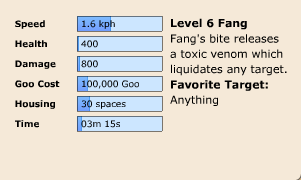
Fang
Fang is yet another glass cannon monster. Fang is not too useful in attacking, even though it has a high attack damage, but that power is best harnessed with Fang's Venom ability.
Using Fang
If you are going to use Fang in an attack, all I can say is, good luck. By the time you unlock Fang, Sniper Towers are going to be strong enough to one hit kill Fang. Besides, it costs a little too much Goo. Fang also needs to be upgraded in the academy to do some real damage. You'd be better off attacking with Bandito.
But not all is lost for our scorpion friend. In the Monster Bunker, Fang will destroy any monster! Fang's Venom ability allows it to poison any monster it attacks, dealing damage over time! So even if Fang dies in combat, the attacked monster will be dead later.
Countering Fang
Fang is slightly simple to counter. Make sure all your Resource Gatherers and other buildings have support from other towers. Keep a mob of Fangs off your Sniper Towers and Tesla Towers by supporting them with Booby Traps, Cannon Towers, Laser Towers, or Railgun Towers. Put some Rocket D.A.V.E. in your bunker, or some Brain with Invisibility. If you can kill him before he gets to any buildings, then your base is fine.
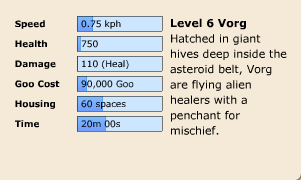
Vorg
Vorg is one of the newer monster released thus far, and can be a great asset to your monster army. It can be considered as a weaker version of Zafreeti, but is very effective in groups.
Using Vorg
When attacking, send in your Defense targeting monsters first. Then send in a group of Vorg to heal them. Avoid sending a group of Vorg next to a nearby Tesla Tower or Aerial Defense Tower, as they will kill your Vorg off. Sniper Towers shouldn't be too dangerous to a big group of Vorg, but be cautious around them.
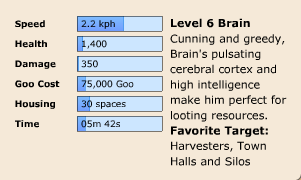
Brain is a sturdier looter than Bolt, and each have their own ways of trickery. While Bolt can Teleport from Resource Gatherer to Resource Gatherer, Brain can become invisible and sneak up to a Resource Gatherer and start looting, without anything noticing!
Using Brain
Brain should be one of the more fun monsters to use. It can turn invisible, allowing you to take some loot without any Defensive Towers noticing! Even after the invisibility wears off, it can take a good amount of hits. For best results, send Brain in small groups of maybe 5-10. It is important to remember that after Brain is done looting, it will travel on to the next building, and its stealth will activate again.
Be wary of the ARGoH, as the Booby Traps can easily take down your Brain. To help prevent your Brain from dying to those pesky Booby Traps, send in some Putty Rage, preferably 5M Putty.
In the bunker, Brain are very interesting. They can sneak up to unsuspecting monsters and attack them. Normally, when an enemy monster sees an bunkered monster coming to them they start walking to each other. But in the case of Brain, the enemy monster cannot see Brain, so they just keep walking!
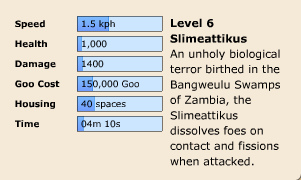
Slimeattikus is one of the monsters that have an ability built into it. It can split when it dies, and become two smaller Slimeattikus with less stats.
Using Slimeattikus
Slimeattikus is one versatile monster. Its splitting ability is plain ridiculous. It can tank damage for other monsters when you run out of Ichi or similar. When it dies, it can still continue to gnaw away at what it couldn't seem to destroy in time. Plus,
Favorite Target:Anything
its splitting can help clear nearby Booby Traps! Sniper Towers will certainly quake in fear when they see this monster.
In terms of defending, Slimeattikus is(figuratively) a monster. Just 6 Slimeattikus can destroy a D.A.V.E. with only one of them dying. Slimeattikus has the power of numbers with such little Housing Space. Its high damage will ensure that it will take down any monster.
Countering Slimeattikus
Slimeattikus, like Ichi, is quite difficult to counter. It fares well against most Defensive Towers. The only towers I can see that would stand a chance against Slimeattikus would be the Railgun Tower and the Suprtz Cannon. The Quake Tower and Laser Tower is very situational, because if Slimeattikus targets that next, the Quake Tower and Laser Tower will quickly be put out of commision. My only suggestion would be to upgrade your defenses, or put Rocket D.A.V.E. in your bunkers.
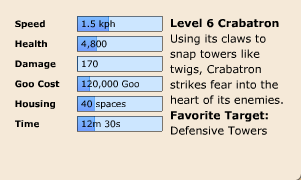
Crabatron
Crabatron is one of the monsters that many players feel need a buff. It is outclassed next to two Level 6 Ichi, and it just doesn't deal enough damage. But let's look at what Crabatron has to offer.
Using Crabatron
Crabatron is really tanky, making it ideal for taking all the damage. What many people do not realize is that Crabatron, like Octo-ooze, is not meant to take down Defensive Buidings, but to stall them. You can think of Crabatron as an advanced Octo-ooze. When attacking, send in a small group of Crabatron at an exposed tower, and send in a few attacker monsters, namely Slimeattikus or Project X.
However, Crabatron is absolutely awful in the Monster Bunker. 4 Octo-ooze could tank more damage than a Crabatron, and they cost much less Goo. Crabatron's damage per housing space just isn't worth it.
Countering Crabatron
Not too diffuclt, suprisingly. If you fortify your defenses, they should last against a lot of Crabatron. In the Monster Bunker, lots of monsters can 1vs1 a Crabatron and win fairly easily.
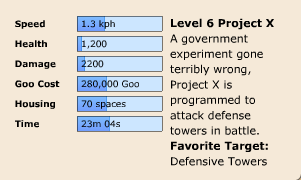
Project X
Project X is a tower's bane. It has a massive attack damage, surpassed only by the suicidal Eye-ra. This somes with the fact that Project X attacks Defensive Towers first before anything else.
Project X is one of the harder monsters to know how to use well. It has an unorthodox favorite target of Defensive Towers, while having low health. Therefore, when attacking, send in a tank monster like Ichi first, then when the Defensive Towers are distracted, send in a few Project X. Sniper Towers and Telsa Towers should go down in no time. Cannon Towers, Laser Towers, Quake Towers, and Railgun Towers are trickier. I recommend not to use Project X against these towers. Instead, use more durable monsters that target Defensive Towers, like Zagnoid.
Countering Project X
Project X should not be a threat if you upgraded your Railgun Towers and Quake Towers. Otherwise, put some Rocket D.A.V.E. or Sabnox to destroy some Project X at a distance to avoid their Acid Spores.
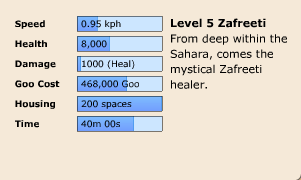
Zafreeti
Ah, Zafreeti, the monster that caused a lot of problems. Before the nerf, Zafreeti made defending almost impossible. But those were its glory days. Now, Zafreeti has seen a slight difficulty in healing up monsters. Nevertheless, Zafreeti is still useful in your monster army.
Using Zafreeti
No one really knows how Zafreeti got nerfed, but he's a bit slower in healing monsters, no longer has splash heal, and can't heal monsters with a certain amount of health gone.
The only way to use Zafreeti well is to place them on your monsters when they are starting to die out. And be wary of the Aerial Defense Towers. They can kill a Zafreeti in seconds.
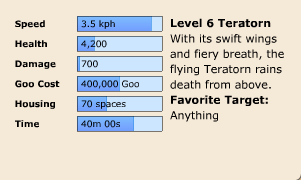
Teratorn is the first monster to take to the skies. Since then, it has become a terror everywhere it goes. Only the brave Aerial Defense Tower can stand a chance against it.
Using Teratorn
Teratorn is different from your other main attacking monsters in that it flies, and can avoid Blocks, Booby Traps, Cannon Towers, Laser Towers, Quake Towers, and Railgun Towers. However, they are weak against an Aerial Defense Tower.
To attack with Teratorn, first scan the yard for the Aerial Defense Tower's positions. As common sense will tell you, avoid flinging your Teratorn there. NEVER try to take your chances by flinging them near an ADT to try taking down a weak building. If the owner's yard even thought about upgrading their defenses, your Teratorn will drop dead in a snap.
The Bouncing Flame ability for Teratorn makes it a bit easier to decide where to fling your Teratorn, as you can send them 3 buildings away from the one you want to destroy.
Don't worry about Sniper Towers. They don't pose a big threat to even a small group of Teratorn. If you want to attack where there are Tesla Towers, try sending in a bigger mass of Teratorn.
Countering Teratorn
The placement of your Aerial Defense Towers in relation to your yard's needs are imperative. Should they be misplaced, your yard is doomed to fall beneath the might of the Teratorn.
It's best to place your ADT's between two Storage Silos, since many people will try to catapult it. Also keep them near the middle of your base, where your ADT's can cover the most buildings.
Keep a D.A.V.E. in your bunkers, or if you need to save space, put in at least a Sabnox. That way, your have more aerial defense options and can take some burden off of good positioning for your Aerial Defense Towers.
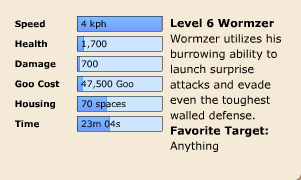
Wormzer
Wormzer is the first ever monster able to evade Blocks and Booby Traps while moving. Ever since Teratorn was released, however, Wormzer has been shunned aside. Wormzer can still fill in a few niches in your monster army.
(Bonus Trivia: Wormzer has the greatest stats in relation to its Goo Cost.)
Using Wormzer
Wormzer is perhaps the hardest monster to use properly. It targets anything and has low health, making it susceptible to damage before it hits the important targets. Therefore, send in your tankier monsters that target anything(like Teratorn), then while they are busy, send in your Wormzer. It is preferable to send them in small groups of maybe 2-4, so they don't all die when one of them surfaces on a Booby Trap.
Remember that if a Wormzer is targeted by a Defensive Tower, Wormzer is not invincible while moving.
In the Monster Bunker, Wormzer can deal some good damage, especially with its Splash damage, but may die a bit too easily for it to be useful.
Countering Wormzer
Wormzer is quite easy to counter. All you need to do is upgrade your Quake Towers. That's it, really. A quick burst of damage on a Wormzer will kill it. If you don't have Quake Towers yet, then try upgrading your other splash damage towers, or maybe upgrade your Tesla Towers. A Level 3 Tesla Tower could kill a single Level 6 Wormzer.
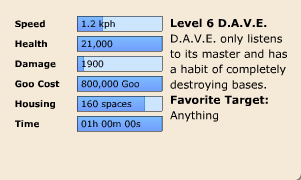
D.A.V.E.
D.A.V.E. is the ultimate monster! It can tank a lot of damage, while dealing great damage without suiciding (*looks at Eye-ra*), and is overall a great monster.
Using D.A.V.E.
D.A.V.E. is so easy to use. All you have to do is plop them down wherever you want, preferably with some Zafreeti, and watch the carnage!
Okay, but really, using D.A.V.E. well does require a bit of planning. It's somewhat slow in the early levels, so it may not destroy the whole base in time. It is crucial, especially in Map Room 2, to destroy the whole base. So when attacking, don't send all your D.A.V.E. in one area. Send them from different angles from the same side of the yard. Splash damage may seem ineffective on D.A.V.E., but over time it begins to add up. And remember, Zafreeti can only heal so much.
Countering D.A.V.E.
D.A.V.E. is super-tough, so taking this beast down is a pain. Curently, the best towers to take down a D.A.V.E. are the Tesla Tower, the Railgun Tower, and the Monster Bunker.
The Tesla Tower has the power to destroy at least one D.A.V.E. Hopefully, you have read the guide in the section telling you how to counter Zafreeti. If so, D.A.V.E.'s power is significantly weaker when your base's design targets the Zafreeti instead of D.A.V.E. Without a Zafreeti to heal D.A.V.E., the Tesla Tower stands a chance against one D.A.V.E.
The Railgun Tower is capable of taking out a fine amount of D.A.V.E., but it takes some time. Make sure your RGT's are upgraded and protected.
The Monsters Bunker is perhaps the best defense against D.A.V.E. A mass of Bandito can take down a suprisingly good amount of D.A.V.E. Slimeattikus yields similar results. Octo-ooze can stall them.
The Towers
Sniper Tower
The Sniper Tower is the first Defensive Building you will construct, and it is very powerful in the early levels. Its damage output is quite high, however slow it may be, and can take down even the bulkiest monsters.
Attacking
The Sniper Tower is a nuisance in the early levels. In the late levels of the game (Levels 39 and up), their damage starts to be somewhat lacking, but they still pose a threat, especially to Zafreeti. If you are facing against a yard that has integrated the DAM layout into their yard, be advised that your Zafreeti or Vorg will be in some big trouble.
But, in general, sending in a few high health monsters at a Sniper Tower will finish this tower.
Defending
The Sniper Tower is one of the towers where it can perform well, no matter where it is placed. (Now, I don't mean it works well even if left in the corner unprotected.) I mean, if you place it on the outside of your base, it can get early hits on some monsters(though it might be destroyed). If placed inside your base, it can fire away at monsters that part from their army, while giving some aerial coverage(but it doesn't deal enough damage to Teratorn).
Basically, the Sniper Tower is a supporting tower, and should be used to help relieve the burden of the other Defensive Towers.
Cannon Tower
Sigh, it is the Cannon Tower. It has never received any love from the developers ever since the release of Teratorn, and it has been shunned into the depths of misery, where it is called useless and lame. To think that those remarks were the politest of them all.
I am being serious. Its damage per second is just pathetic. Yes, it can take down a Pokey Bomb, but so what? Who woud send a Pokey Bomb at a Cannon Tower, anyway?
Attacking
Unless you are attacking with Pokey, this tower should not be a problem, as I have implied earlier.
BUT!
Smarter players will not use Cannon Towers for their damage output, but for the fact that it is a Defensive Tower and that it can stall monsters. They may want your Crabatron lured to the Cannon Tower, so that they die by a Heavy Trap! And do not, DO NOT assume that the Cannon Tower does zero damage. If you have sent any fragile monsters into battle, and the Cannon Tower is attacking them...You're losing a lot of damage output.
Defending
The Cannon Tower is so weak, you wouldn't think it to do anything. But if you stop for a moment and mull over the placement of your Defensive Towers, you will realize that your stronger Towers will need protection to deal its maximum damage output. This is where the Cannon Tower comes in. The loss of a Cannon Tower is not too bad to your base, so place them in front of your more important towers.
Tesla Tower
The Telsa Tower is certainly a shocking tower! It fires multiple blasts of electricity at a single monster. It is specialized in taking down super tanky monsters.
Attacking
The Tesla Tower can be a huge threat to your tanky monsters. It can take one of them down, in just a few seconds. However, the best way to counter the Tesla Tower is to send in a Zafreeti, or if there is no Zafreeti, send your monsters in a group. The Tesla Tower has some trouble taking down big mobs of monsters. (Bonus Trivia: After killing a monster, the Tesla Tower will waste one or two charges before targeting another monster.)
Defending
This tower is very important to protect, as it can take down very tanky monsters quickly. It will have trouble against a D.A.V.E. when healing by a Zafreeti, however.
Tower Combos
Sniper Tower + Cannon Tower
This combo will be the most common one in the early stages of the game, partly becasue that is all the player can build, really. But early in the game, it is a strong duo. Late game, you should not worry about this one too much. If the Sniper Tower is in front, send in a mass of high health monsters of about 10-15 of them. They should take down the Sniper. Then, if your monsters need help taking down the Cannon Tower, send in just a few more monsters.
If the Cannon Tower is in front, send in two groups of 5 monsters, one right after the other, to help miminize the damage the Cannon tower will give. Then they should take down the Sniper without a problem.
Sniper Tower + Tesla Tower
You may see this where there is not much aerial coverage. If there are no Aerial Defense Towers nearby, use Teratorn to knock them down. Otherwise, try using Crabatron with Project X, or Ichi with Bandito.
Sniper Tower + Laser Tower
This is very common late game. Usually, the Laser Tower is in front. Catapult the Sniper Tower so that is will not deal as much damage, and then send in pairs of monsters in quick succesion. (Ex. Send in 3 Ichi, constantly.) If possible, place them under Putty Rage.
Alternatively, you could use ranged or aerial monsters. Teratorn is perhaps the best at countering this combo, as the Sniper Tower does not do much damage to a small group of Teratorn. Sabnox and D.A.V.E. works, too, being able to attack the Laser Tower without retailiation.
Sniper Tower + Railgun
You won't see this combo too much, as not many people think of it. But it is quite powerful. The best way to fight it is to take down the Railgun first with the catapult. If necesary, fling some Putty Rage onto your monsters, preferably high health ones.
Sniper Tower + Monster Bunker
This one is scary, all right. If there is a Sniper Tower plus Monster Bunker combo, the bunker will usually contain splash damage monsters. The best way to counter it is by sending in very high health monsters, preferably with a Zafreeti or some Vorg, if you are worrying about the Sniper Tower.


